


Food stylist, TV presenter, author, cook and baker, Juliet Sear has had the honour of making all sorts of cakes and other delicious treats for countless people, including Prince Harry, Kate Moss, Holly Willoughby, McFly and Alexa Chung.
Juliet’s recipes and food styling can be found in countless magazines, in her four recipe books and you can see her on TV on This Morning and Sunday Brunch.
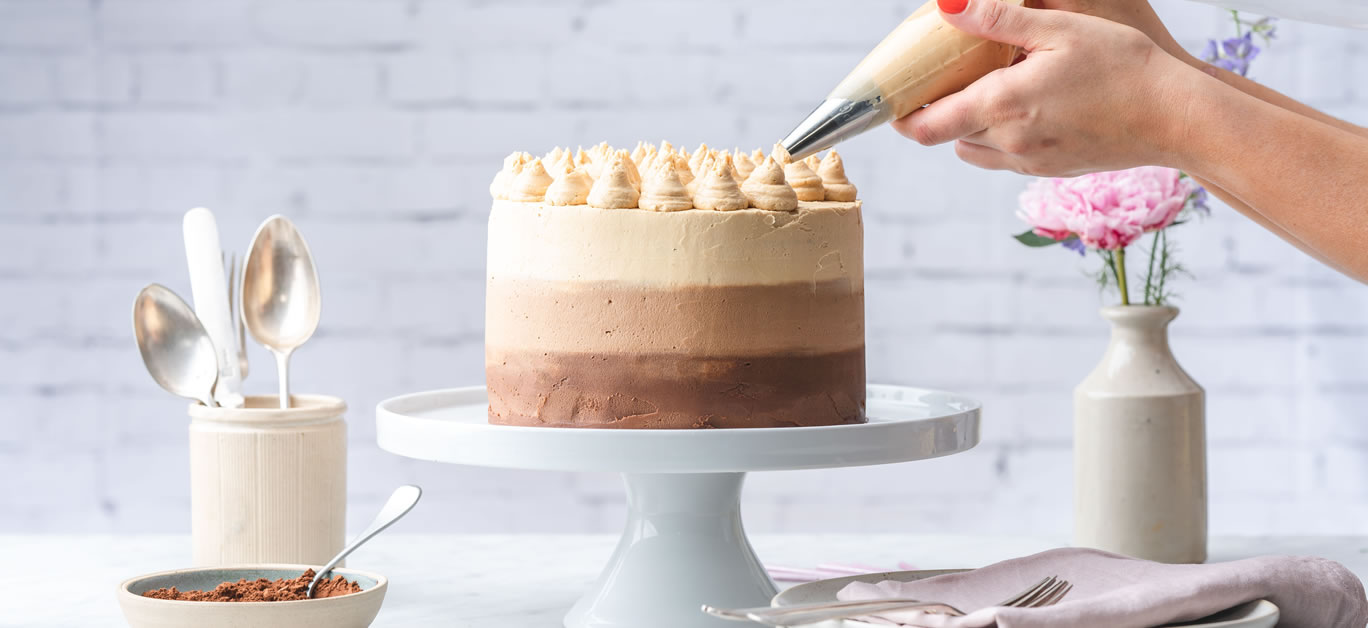
Here, she has teamed up with leading brand Camp Coffee to show you how to make the most mouthwatering coffee mocha ombre cake at home.
Camp Coffee Mocha Ombre Cake by Juliet Sear
Makes one 7” round cake to serve approximately 20-24 small portions
Prep and decorating time: 1.5 hours
Bake time approximately: 25 mins
Chill time: 1 hour
Equipment needed
4 x 7” round cake tins (or do in batches)
Medium crank handle palette knife
Small palette knife or sharp knife
Icing scraper (optional)
Piping bag fitted with a large open star nozzle (I used a 1m)
A cake plate or stand
Cake turntable (optional)
Baking parchment
Cake ingredients
300g self raising flour
80g cocoa powder (unsweetened)
425g golden caster sugar
1 teaspoon baking powder
1 teaspoon salt
160g sunflower or vegetable oil
4 medium free range eggs
2 teaspoons vanilla extract
330ml buttermilk, at room temperature
300ml hot water
4 tbsp Camp Coffee
Chocolate and coffee buttercream ingredients
1.2kg icing sugar, sifted
600g unsalted butter, softened at room temperature
2 tbsp Camp Coffee
75g dark chocolate chips or chopped chocolate
Plus some chocolate coated coffee beans to decorate (optional)
This makes plenty, but it’s always best to prepare a bit more than you need. Everyone adds icing at different thicknesses, any leftover can be kept in the fridge for two weeks or frozen for three months.
Method
1. Preheat the oven to 170 fan. Grease, base and side line 4 x 7-inch round cake tins (or do in batches if you have one or two tins).
2. Dry whisk the flour, cocoa powder, sugar, baking soda, baking powder, salt, and together in a large bowl. In another (using an electric whisk, stand mixer fitted with a whisk attachment or by hand with a balloon whisk), mix the oil, eggs, and vanilla together on medium-high speed until combined. Add the buttermilk and mix.
3. Pour the wet ingredients into the dry ingredients, add the hot water and Camp Coffee, and whisk or beat on low speed until the batter is completely combined. It will be a runny, liquid batter. Divide evenly between the cake tins and bake for 22-26 minutes or until a toothpick inserted in the centre comes out clean. Baking times vary with different ovens so keep an eye after 20 minutes.
4. Let them cook in the tins for 10 minutes then carefully turn out onto a wire rack. Don’t worry if they sink a little bit, this is a dense, rich and moist cake and this is normal. While they are cooling prepare the buttercream.
5. In a stand mixer, with an electric whisk or by hand with a bowl and wooden spoon, beat the soft butter until really pale and creamy. Gradually beat in the icing sugar on slow, then turn up the speed once the sugar has disappeared and beat in well until all the icing sugar beaten in and you have a pale, creamy fluffy frosting. Beat in the Camp Coffee until smooth and blended, set aside covered with a clean tea towel.
6. Now it’s time to fill and coat the cake. If your sponges are a little uneven, carefully trim with a long sharp bread knife or cake leveller. You want the layers to be a nice and even thickness, so the cake looks neat. It depends on your oven; you might find they are all perfectly flat.
Place the first sponge layer centrally on the cake stand or plate and pipe on about 150g of frosting. With a palette knife held at a flat angle against the cake, smooth over evenly over the sponge, allowing it to slightly poke over the edge a little. Top with the second sponge, make sure it is central, push down firmly and repeat with another layer of about 150g frosting. Continue and with the last sponge, invert this so that the smooth part that was in the bottom of the tin is uppermost, push down and check it’s all in line as much as possible.
7. Smooth around the cake edges spreading the icing to fill the gaps between each sponge layer, then pile on about 300g icing to the top of the cake and using a palette knife, spread over the top and sides as neatly as you can, giving the whole cake a thin coating of icing that will cover over, fill any gaps in the sponge and seal in the crumbs ready for the next coating. This is called a crumb coat in the trade!
Pop this into the fridge. This will help you to decorate your cake in the ombre style neatly, because if you went straight over the cake at this stage, it would move and slide about and be hard to get a neat finish.
8. Once the cake has set, it’s time to add the rings of chocolate mocha icing to finish. Melt the chocolate over a bain marie or in a microwave gently, then leave to cool slightly. Place 250g of buttercream in a bowl and add the melted chocolate and beat in well to combine. Place 200g of coffee buttercream in a bowl ready to mix with the remaining chocolate buttercream.
9. To begin, use a small or medium palette knife to spread a ring of the chocolate coffee icing around the cake in a neat band, approximately 1/3 of the depth in a circle around the bottom edge. It needs to be fairly even and about 4/5mm thick. don’t worry if it’s not completely straight just make it as neat as you can.
Use whatever icing you have left and add this to the bowl of coffee frosting that you reserved earlier to make a mid light brown icing shade. Add this in a ring around the middle of the cake, joining against the chocolate ring, bringing the icing up to about 2/3 of the sides. Smooth it around as neatly as you can.
10. For the rest of the cake, pile about 350g on top of the cake and spread over the top with a medium sized palette knife in a back and forth motion, to cover the top of the cake, pushing this right over the edge, then change the angle to be upright against the side of the cake and spread a band around the top of the cake, joining this up to the mid colour shade to finish.
You’ll need a spare bowl to hand as you will end up scraping off some of the mixed colours of buttercream, as you spread over and neaten the sides, so you can scrape this into a bowl and this will keep in the fridge or freezer to use another time (or serve as extra with the cake slices).
Use the palette knife to now smooth all around the cake, keeping it at a straight angle to the cake, swooshing round over all three shades to create a flat coating.
Top tip: If you want to get it very smooth, you can use a clean cake scraper to go around the edge. It is handy to do this on a turntable if you have one (top tip, you can use a microwave plate which helps you to spin the cake round). The way to do it is to hold a large clean palette knife or cake smoother against the side of the cake, holding it completely straight and at an angle of about 30 decrees against the cake and then, in one motion, begin at the back of the cake and spin the cake round, sweeping the coating firmly, ideally all in one go to smooth over the cake. Tidy up and icing that is creeping up over the top edge with a clean sharp knife or palette knife and try to get the top and sides as neat as you can.
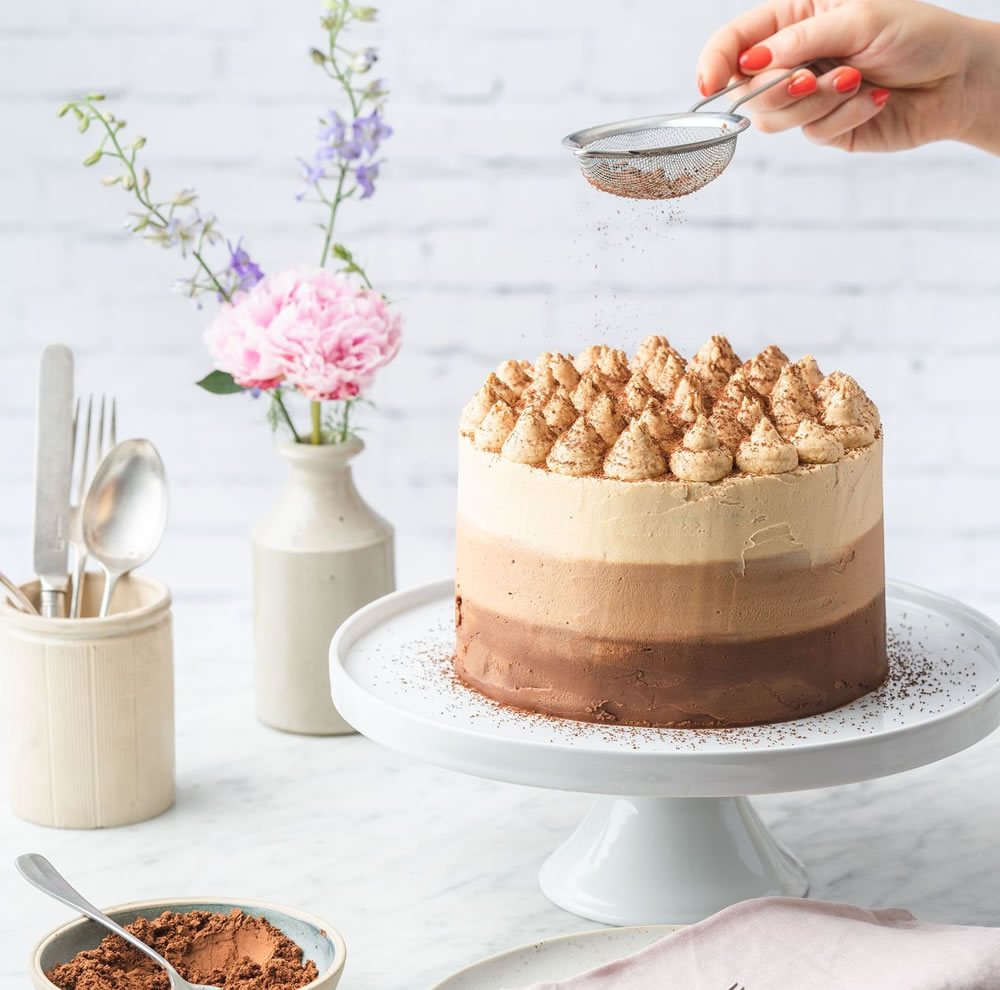
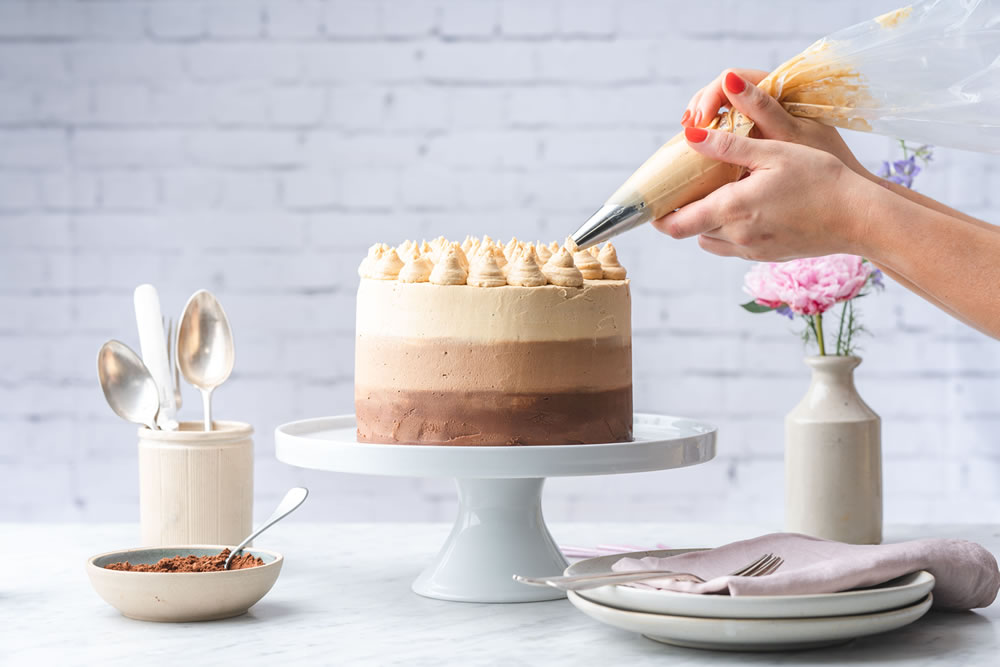
If you want to make it look really fancy, it’s nice to put an extra 200g buttercream in the piping bag and pipe little swirls around the top of the cake, as shown, and top each of these with a little chocolate coated coffee bean as a finishing touch.
This cake will last for up to three days in the fridge, make sure to bring it to room temperature when you want to eat it. Alternatively, slices can be frozen for up to three months too.